X Programming: CLIPBOARD
Contents:
This post will be about CLIPBOARD in X Window System. the documentations out there are really obscure (at least for me) therefore i made this post, maybe it helps someone. I will discuss how to interact with the clipboard, as a client that reads its content, and also as an owner. but first BASICS.
Intro:
I hope you already familiar with X basics, as this post is basically about the CLIPBOARD mechanism in X. However just to get everyone on the same page, i will briefly talk about some X Concepts.
X Window System:
X Window System or X is the windowing system that is responsible of graphics stuff on most of Unix and Linux systems. thus responsible of drawing to screen, creating windows, user interactions, etc. X is based on a client-server model, where the client is the programs that request services from the server ( GUI services, clipboard services, ..) and the server is a local or a remote X Server, and it uses the X Protocol to communicate with its clients. X11 (X11R7.7) is the most recent version of this protocol released in June 2012.
Server Address:
The server address is the address of the X Server that our client will connect to, and it is saved in the envirenement variable $DISPLAY in your system.
the format of the server address is: <hostname>:<display>.<screen>, run this to check it on your system:
$ echo $DISPLAY
:1
you may get some output like: :0.1 or :1, when the hostname is not set that means that the server is listening locally on your system, we will look later on the code of the library to learn where the server is actually listening “locally”.
- Hostname is the IP of the X Server or a resolvable hostname (DNS name).
- Display refers to a group of Screen/s and Input devices (keyboard, mouse, ..), this is used to configure on which Screen/s (phisical monitor) the output will be shown and which input devices to use.
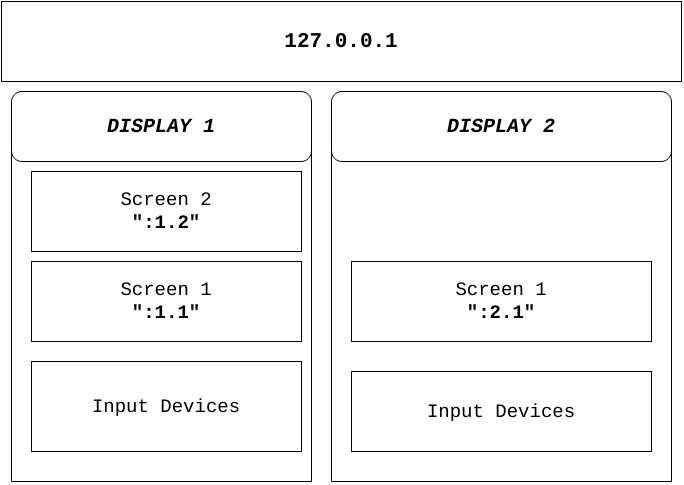 in the diagram above the Server address is 127.0.0.1, and there is two displays in this Server 1 and 2, to use the monitor 2 in the display 1 the server address will be: “:1.2” (display 1 -> monitor 2).
Root Window:
This is a thing that you will hear a lot when dealing with X, the root window is the first window created on your system by X and it is as large as your screen and it is always present, this window is usually obscured with your Desktop Environment (KDE, Unity, ..) as it draws on top of it widgets, bars, icons..
Windows are organized into a tree hierarchy and the Root Window is at the top of this tree, and all the other windows created on the system are direct childs or indirect childs (created by an other child window) of this Root Window. Each Window on X is identified by an ID usually formatted as a hex value. (e.g: the Root Window ID on my box is: 0xA0).
hakivvi@linux-box:~$ xwininfo -root | grep "Window id"
xwininfo: Window id: 0xa0 (the root window) (has no name)
hakivvi@linux-box:~$
xwininfo is a X utility (a program provided by the X System, usually these programs do something related to X). this particular command displays infos about the Windows in the system, in the example above, i’m running it with the -root option, this option means that we want informations about the Root Window. and there you can see the Window id: is 0xa0.
the Window Manager (Gnome, KDE, XFCE, ..) in your system controls the Root Window (using a X feature, we won’t discuss it this time, that’s beyond the scope of this post) and therefore all the other created windows in your system as the Root Window is the parent of all of them, then it can draw its decorations and bars around these created windows (the bar with the window name, close/minimize/maximize buttons, ..).
We don’t really care what does the Root Window looks like, but we certainly need to discuss its atoms and properties.
Atoms and Properties:
Atoms are IDs used to indicate resources and they are saved in the Server side, they are 4B (bytes) sized, an Atom is paired with a name (an ASCII string), we can chose a name when creating an Atom but we can’t chose the ID paired with that Atom we created, it is regenerated on the server side (by the X Server), the Atom is not destroyed when its creator exits or dies, so Client B can refer to an Atom created by Client A even if Client A has exited.
A property is a data holder in the Server side which is characterized by a NAME, a TYPE and VALUE, every window has some properties attached to it and can create new ones (e.g: WM_NAME property which holds the name of the Window). a property is used to store VALUE named NAME of type TYPE.
Properties allows you to attach arbitrary data to a Window usually to make it available for other Windows (Inter Client Communication), properties are stored on the Server side. Each property has its NAME which is an Atom, for instance a property named “XP”, is identified by the Atom whose name is “XP”.
Each property has a TYPE, the TYPE itself is just an Atom. so when using the TYPE STRING, we will first use Xlib to obtain the Atom which its name is STRING then use that Atom for whatever we want.
Also the property’s VALUE is stored as an array of 8 bits (unsigned char) or of 16bit (unsigned short) or of 32bit (unsigned int) elements. the properties unlike Atoms are unset (deleted) once the creator window exits or get destroyed.
Properties are identified using an Atom (ID) and a Window, meaning multiple Windows might have a property with the same name (NAME Atom) and we can read each of these properties, because when accessing a property we don’t only use the name of the peroperty but the window also.
You can think of properties like this:
"NAME_OF_PROPERTY"("TYPE_OF_PROPERTY")="VALUE_OF_PROPERTY"
And here is an example, this is a property attached to the Firefox browser window :
WM_NAME(STRING) = "Firefox"
=> property name       =   	WM_NAME 	# WM_NAME is an Atom - ID: 39
=> type of property    =   	STRING  	# STRING is an Atom - ID: 31
=> value of property   =   	"Firefox" 	# "Firefox" is the value of the property
Properties are used in Inter Client Communication, an example is the property _NET_ACTIVE_WINDOW attached to the Root Window which holds the ID of the currently active window, therefore any Client can access this property named _NET_ACTIVE_WINDOW on the Root Window to read the ID of the currently active window.
hakivvi@linux-box:~$ xprop -root | grep "^_NET_ACTIVE_WINDOW"
_NET_ACTIVE_WINDOW(WINDOW): window id # 0x1e0000a
hakivvi@linux-box:~$ xprop -id 0x1e0000a | grep "^WM_NAME"
WM_NAME(STRING) = "hakivvi@linux-box:~$"
hakivvi@linux-box:~$
In the example above, im running another X utility xprop, as it name suggests this program displays the properties attached to the Windows in the system, the first command is executed with the -root option, which means display properties of the Root Window, we grep for the _NET_ACTIVE_WINDOW property (which holds the ID of the currently active window):
_NET_ACTIVE_WINDOW(WINDOW): window id # 0x1e0000a
Nome of the property => "_NET_ACTIVE_WINDOW"
Type of the property => "WINDOW" // this type is used to indicate that the VALUE is a Window (Window ID)
Value of the property => "0x1e0000a" // this is the ID of the Window currently active
next we use the ID of the currently active window with xprop but this time we are looking for the WM_NAME property (holds the name of the Window), this way we print the name of the currently active window which is the terminal im running these commands on.
remember when i said that the NAME and TYPE of properties are just Atoms, let check if that is true:
hakivvi@linux-box:~$ xlsatoms | grep "_NET_ACTIVE_WINDOW"
318	_NET_ACTIVE_WINDOW
hakivvi@linux-box:~$ xlsatoms | grep "WINDOW"
33	WINDOW
hakivvi@linux-box:~$ xlsatoms | grep "WM_NAME"
39	WM_NAME
hakivvi@linux-box:~$ xlsatoms | grep "STRING"
31	STRING
hakivvi@linux-box:~$
xlsatoms (X list Atoms) is another X utility which lists the the Atoms in the X Server, the number in the left is the ID/Atom and the string in the right is the name of the Atom, and as you can see all the NAME and TYPE we have used so far are indeed Atoms. said number is what actually sent to the X server, instead of sending the name of the Atom for instance “STRING” we only send the 4 Bytes integer 31. this helps a lot to avoid creating to much load on the connection and send less bytes on the wire.
NOTE: Atoms should have unique names, for instance the X Server predefines (creates) 68 Atoms (Atom 1 to Atom 68) because they are commonly used, if any client asks for example to create Atom named “PRIMARY” the server will just return the Atom 1 (ID of PRIMARY), as it is already created by the X Server. the same for X clients also, if client A creates Atom “TEST” ID: 432, client B can’t create a new Atom with the same name “TEST” instead the server will just return the Atom 432.
Requests and Events:
As X is based on a client-server model, that means there should be a sort of sevices provided by the server and requested by the client. Requests are what is sent to the X Server when a client needs some service, for instance if a client wants to create an Atom, he needs to send a InternAtom request to the server (ofc we won’t do this ourselves the library we will use will take care of this).
In the other hand the Events are a reporting mechanism, sent by the server or the client to tell the receiver that something happened. for instance the event PropertyNotify is sent to the client when a property attached to a Window is edited (deleted or new value is set), the cool thing about Events is the client can chose to receive only for the Events he is interested in (e.g: a client can ignore the PropertyNotify event if he wants to), however there are some Events that can’t be masked/ignored (the client can’t chose to ignore these Events, e.g: SelectionRequest Event).
I lied to you there is no “clipboard”:
X is the system clipboard manager, and the way it is doing so might seem strange and confusing for users of other operating systems, lets try something:
- open a Terminal
- now select this line and don’t click anywhere else on the browser so you don’t deselect it (de-highlight it)
- go back to your Terminal and click the
middle buttonon your mouse orSHIFT+Inserkeybinding
you are supposed to paste the content you highlighted though you didn’t explicitly copy it, you only selected/highlighted using your mouse. lets try something else:
- copy this using
Edit -> CopyorCtrl+Ckeybinding (select the text then right click on your mouse to toggle theEdit menu) - select this but don’t click anywhere else so you dont deselect it
- carefully go back to your Terminal
- paste the content you explicitly copied, using:
Edit -> PasteorCtrl+Vkeybinding - paste the content you highlighted, using: the
middle buttonon your mouse orSHIFT+Inserkeybinding
you are supposed to paste both texts.
X11 is actually using the selection system, and it has two standard selections which most of clients are compatible with (PRIMARY, CLIPBOARD), and said selections do not interfere, that is why we were able to use both of them in the same time.
X Selections:
X was actually using the simple Clipboard in its older version before introducing Selections, this clipboard(s) called Cut Buffers, the CUT BUFFERS[7] are 8 properties on the Root Window, so whenever the user copies something the client writes the copied data to one of these properties, and if any client needs the CLIPBOARD content he reads these properties, no one uses it anymore, don’t.
X11 is using nowadays X Selections, there is three standard selections defined in the ICMMP:
- PRIMARY: stores the currently selected content (highlighted content)
- CLIPBOARD: stores the content explicitly copied with
Edit -> Copy/CutorCtrl+C/Xkeybinding - SECONDARY: used as auxiliary selection by the programs/clients, the users usually won’t be dealing with this selection.
Selections work differently than the old Cut Buffers, when using Selections no data is actually sent to the X Server when the user highlight/copy some content. instead, the owner window (the window which has the content the user selected or copied) only informs the X Server that it has the ownership of the appropriate selection (PRIMARY if selection, CLIPBOARD if copy), the X Server keeps note on who owns the Selections, so later if any other programs asks for the Selection content the X Server will know to which window he will redirect the request.
The Selections are represented by their NAME Atoms, when a client needs to deal with the PRIMARY Selection for instance, he first obtain the Atom (ID) whose name is “PRIMARY” from the X Server, then use that Atom for whatever he needs to do with the PRIMARY Selection (passing the Atom he got to other X functions). Whenever you want to manipulate any Selection you have to use the NAME Atom which represent this Selection.
NOTE: the PRIMARY and SECONDARY have a predefined Atoms (meaning you don’t need to create them, their IDs are 1 and 2), in the other hand the CLIPBOARD Selection does not have a predefined Atom, it is created by the first X Client who asks the Server to do so.
Show me some code:
When programming X in C/C++ we have two official libraries to use Xlib and XCB, i will be using Xlib as it aims to hide the X Protocol specifications with a programmer friendly APIs, but in the other hand XCB exposes the protocol details to the programmer and he has to deal with it. so go on and install the development headers package:
$ sudo apt-get install libx11-dev
Connecting to the X Server:
So the first thing you want do when programming a X client, is to actually connect to the X server, so the program we are creating will be able to communicate with the X Server.
Xlib has the XOpenDisplay() function that will take care of the low level details of connecting to the server, it takes a single argument a server_name (discussed here) which our client will connect to and returns a pointer to a Display (an opaque structure that serves the connection to the X Server, e.g: Display.fd is the file descriptor of the connection to the X Server), the documentation states that if we pass NULL as an argument, the funtcion will itself take care of finding the address name (the value of the environment variable $DISPLAY will be used).
the value of the $DISPLAY variable on your system might be two number with a dot or just a single number, so lets have a look on how XOpenDisplay() function connects to the X Server if we have a $DISPLAY without a hostname (e.g: “:0.1”, “:1”, ..):
Display *
XOpenDisplay (register _Xconst char *display)
{
	[..] // init function's variables
	/*
	 * If the display specifier string supplied as an argument to this
	 * routine is NULL or a pointer to NULL, read the DISPLAY variable.
	 */
	if (display == NULL || *display == '\0') {
		if ((display_name = getenv("DISPLAY")) == NULL) {
			/* Oops! No DISPLAY environment variable - error. */
			return(NULL);
		}
	}
	else {
		/* Display is non-NULL, copy the pointer */
		display_name = (char *)display;
	}

	[..] // Allocate memory for the Display structure

	if(!_XConnectXCB(dpy, display, &iscreen)) { // _XconnectXCB() will assign dpy->fd the file descriptor of the opened connection to the X Server
		OutOfMemory(dpy);
		return NULL;
	}

	[..] // set values to other Display structure members
}
so it retrieves the $DISPLAY environment variable, then it calls _XConnectXCB(), which in turn call multiple functions each calls other functions, but in the end of the day _xcb_open() is the function we want to see:
static int _xcb_open(const char *host, char *protocol, const int display)
{
	int fd;
	static const char unix_base[] = "/tmp/.X11-unix/X"; // this is the base filename of the socket where the X Server is listening on
	const char *base = unix_base;
	size_t filelen;
	char *file = NULL;
	int actual_filelen;

	[..] // check if there is a hostname in the server_name if TRUE use TCP/IP connection and return

	actual_filelen = snprintf(file, filelen, "%s%d", base, display); // the base file name concatenated with the Display number, e.g: $DISPLAY=":0.1" -> file = "/tmp/.X11-unix/X0"

	[..] // check if the Linux kernel supports "Abstract Unix Domain Sockets", if TRUE use them and return

	fd = _xcb_open_unix(protocol, file); // open a connection to the X Server using "Unix Domain Socket"

	[..] // check if the connection failed and no hostname is set, if TRUE open a TCP connection to "localhost:6000+Display"

	return fd; // return the file discriptor of the open connection to X Server, will be assigned to `Display->fd` by _XConnectXCB() function
} $DISPLAY’s value is parsed using some functions i didn’t include in this blog, According to these function’s code the Display is the number between the colon and the dot (eg: “:1.2” => “1” , “:1” => “1”, “:2.1” => “2”, ..), this number is concatenated with the unix_base string which is a filename. the result string is the filename of the Unix Domain Socket used to open the connection to the X Server.
NOTE: _xcb_open() checks for the type of the OS, and if the Linux kernel supports Abstract UDS, the connection target depends on these checks. but generally if you are on a systemd Linux distro -which i suppose- the library will use the filename discussed above, if Abstract UDS is available (depends on the Linux kernel version) it will be used to open the connection otherwise UDS.
Here is the $DISPLAY variable and the socket file location on my box:
hakivvi@linux-box:~$ echo $DISPLAY
:1
hakivvi@linux-box:~$ ls /tmp/.X11-unix/
X1
hakivvi@linux-box:~$
Creating Atoms and Properties:
We talked earlier about Atoms and Properties, now lets create a bunch of them with Xlib.
Creating Atoms:
// compile with "-lX11" flag to link the Xlib files
// gcc file.c -o file -lX11
#include <stdio.h> 	// std functions
#include <X11/Xlib.h>   // Xlib functions make sure you installed the dev package

int main() {
	/*
		This example we will create an Atom named "ATOMX11"
	*/
	// Display structure is serving the connection to the X Server, it is holding the file descriptor of the network socket, display number, ..
	Display * xdpy;
	// Atom is just a typedef of `unsigned long` (basically represents the IDs we talked about)
	Atom created_atom;
	// Atom name
	char * atom_name = "ATOMX11";
	// connect to the X Server
	xdpy = XOpenDisplay(NULL);

	// Xlib function to create Atoms: XInterntom(display_connection, "Name of Atom", OnlyIfExist)
	//
	// OnlyIfExist flag is used whe we need an Atom we are expecting to be created
	// in this case we are not, we are the ones who will create "ATOMX11" Atom
	// so we set it to False
	created_atom = XInternAtom(xdpy, atom_name, False);
	if (created_atom == None)
		printf("failed to create Atom");
	// we use XGetAtomName() to get the atom name
	// XGetAtomName(connection, atom)
	char * obtianed_atom_name;
	obtianed_atom_name = XGetAtomName(xdpy, created_atom);
	// LOG()
	printf("Atom \"%s\" is created, ID: %ld\n", atom_name, created_atom);
	printf("Atom name we got using XGetAtomName() for Atom %ld -> \"%s\"\n", created_atom, obtianed_atom_name);
	return 0;
}
The code above creates an Atom named ATOMX11, we first open a connection to the X Server using the XOpenDisplay() function and we pass NULL as an argument so it finds the address of the server itself, next we create an Atom using XInternAtom() function, this function takes 3 arguments *Display and name of Atom and a flag OnlyIfExist, we will be using the first argument a lot as it is the structure that represents our connection to the X Server and every function needs to communicate with the server, the second argument if the name of the Atom ATOMX11, the last argument is a flag, if set to True it will only return the Atom with the name we passed only if it already exist, and as we know there is no Atom named ATOMX11 we pass False meaning if there is no Atom named ATOMX11 then create it.
We also use XGetAtomName() to get the name of the Atom we just created (“ATOMX11”) in this case we already have the name but this function is useful in other cases when you only have the Atom(ID) (basically when communicating with other clients you won’t receive the name of the Atom instead you will get the Atom(ID)).
lets check if the Atom is created:
hakivvi@linux-box:~/X11-code$ gcc create_atom.c -o create_atom -lX11
hakivvi@linux-box:~/X11-code$ ./create_atom
Atom "ATOMX11" is created, ID: 638
Atom name we got using XGetAtomName() for Atom 638 -> "ATOMX11"
hakivvi@linux-box:~/X11-code$ xlsatoms | grep "ATOMX11"
638	ATOMX11
hakivvi@linux-box:~/X11-code$
Indeed, the Atom is created, our program logged the Atom ID is 638 as xlsatoms command confirmed. notice that the Atom is kept even though our program already exited.
NOTE: if you run the program again it will return the same ID, because the Atom “ATOMX11” is already created.
Creating Properties:
#include <stdio.h>	// std funcs
#include <X11/Xlib.h>   // Xlib funcs
#include <string.h>     // strlen()
#include <unistd.h>     // sleep()

int main() {
	/*
		example code to create a property in X
		1. first create a Window
		2. create the Atoms that represents the NAME and TYPE of the property
		3. set value to the property
	*/

	// property name / name of the Atom that indicates NAME of the property
	char * name_of_prop = "MESSAGE";
	char * type_of_prop = "STRING";
	// connect to the server
	Display * xdpy;
	xdpy = XOpenDisplay(NULL);
	if (!xdpy) {
		printf("Couldn't connect to the X Server\n");
		return 1;
	}
	// create an unmapped window (i.e: invisible)
	// to create a window we need a parent window, we are creating a top level window (the first window)
	// so the parent is the Root Window

	// the screen number
  	int screen;

	// Window is a typedef of `unsigned long` windows in X are represnted using IDs
	// these IDs are hex values
  	Window client_window, root_window;

  	// get the screen number, required to get the root window
  	// this is a macro not a function
  	// it will extract the screen number we are connected to from the xdpy structure
	screen = DefaultScreen(xdpy);

	// get the root window, this is also a macro
	root_window = RootWindow(xdpy, screen);

	// XCreateSimpleWindow() is a Xlib function used to create a simple window
	// this function requires a parent window, thats the Root Window
	// when we first create a Window in X it will be on `Unmapped` state meaning invisible
	// to map it (make it visible), you have to call XMapWindow(xdpy, client_window)
	// we won't do that cz we dont really need to
	// -----
	// the parameters are just attributes of the window like the x,y, colors ..
	client_window = XCreateSimpleWindow(xdpy, root_window, -10, -10, 1, 1, 0, 0, 0);

	// LOG()
	printf("Default screen number:   %d\n", screen);
	printf("Root Window        ID: 0x%lX\n", root_window);
	printf("Window Created     ID: 0x%lX\n", client_window);

	/*
	 	create a property named "MESSAGE"
	*/

	Atom prop_name, prop_type; // NAME and TYPE Atoms
	unsigned char * prop_value = (unsigned char *)"hello world!"; // VALUE

	// create NAME Atom
	prop_name = XInternAtom(xdpy, name_of_prop, False);
	if (prop_name == None) {
		printf("failed to create the NAME Atom\n");
		return 1;
   	}

   	// get the STRING Atom, this Atom is predefined
	prop_type = XInternAtom(xdpy, type_of_prop, False);
	if (prop_name == None) {
   	       printf("failed to create the TYPE Atom\n");
		return 1;
	}

	// LOG()
	printf("Atom \"%s\" created, ID: %ld\n", name_of_prop, prop_name);
	printf("Atom \"%s\" predefined, ID: %ld\n", type_of_prop, prop_type);

	// to fill the property with the data we want, we have to use the XChangeProperty() function in the replace mode
	// NOTE: return value "1" in Xlib means success :P
	int returned;
	returned = XChangeProperty(xdpy,   	/* the connection to the X server */ 	                            					client_window,  /* the window we want to change its property */
                             	prop_name,  	/* NAME */
                             	prop_type,	/* TYPE */
                             	8,         	/* VALUE is an array of `unsigned char` so we use `8` (bits). `16` for `unsigned shor` and `32` for `unsigned int` */
                           	PropModeReplace, /* mode: Replace */
                            	prop_value, 	 /* VALUE */
                            	strlen((char *)prop_value) /* length of VALUE */
                            );

	// Flush the output buffer
	XFlush(xdpy);
	// LOG()
	printf("property created: %d\n", returned);
	printf("\n\n");
	printf("Sleeping, run \"xprop -id 0x%lx\" to see the prop value \n", client_window);

	// sleep because if we exit the property will be unset
	for (;;)
		sleep(1000);
	return 0;
}
the code above will create a property NAMEd “MESSAGE” with “hello world!” as the VALUE of TYPE “STRING”, the code is well commented but here is the steps:
- connect to the X Server using
XOpenDisplay() - first as we are creating a “property” then we need a Window to attach it to
- create a simple Window using
XCreateSimpleWindow()this function take as arguments: the connection ofc, the parent window and the attributes (x, y, border, colors, ..) of the Window it will create, i just used dummy attributes because we won’t draw the Window. - NAME and VALUE of the property are just Atoms so we create/get them using
XInternAtom() - then we use
XChangeProperty()with the flagPropModeReplaceto replace VALUE of the property
I have also used XFlush(), this is a thing i didn’t mention yet. Xlib is using buffering, meaning when we send a request to the X Server using some X function, it is not actually sent to the Server instead it is just saved in a buffer (called the output buffer), Xlib keep saving the requests in the output buffer until:
- we explicitly flush the buffer using
XFlush() - the buffer runs out of space (default size is 16Kb but you can edit this by setting the
XLIBBUFFERSIZEenvironment variable) - you request the next event from the Event Queue.
once one of these happens, the requests will be sent to the X Server to be processed.
hakivvi@linux-box:~$ gcc create_prop.c -o create_prop -lX11 # Terminal 1
hakivvi@linux-box:~$ ./create_prop
Default screen number:   0
Root Window        ID: 0xA0
Window Created     ID: 0x4C00001
Atom "MESSAGE" created, ID: 595
Atom "STRING" predefined, ID: 31
property created: 1


Sleeping, run "xprop -id 0x4c00001" to see the prop value
hakivvi@linux-box:~$ xprop -id 0x4C00001 # Terminal 2
MESSAGE(STRING) = "hello world!"
hakivvi@linux-box:~$
As you can see create_prop program has indeed created a property “MESSAGE”, the window created by the program has ID: 0x4C00001. the program is sleeping because if he exit the property will be unset.
You might be wondering, why nothing showed up in your screen though we have created a Window. well, in X a created window is invisible by default and making it visible is another different process called mapping, and it is not done by XCreateSimpleWindow() function, you basically need to map the Window using XMapWindow() function, i didn’t include that in the code because manipulating the properties does not require a mapped window.
Manipulating the CLIPBOARD:
Now it is time to read and write (own) to the Selections (CLIPBOARD). I made this diagram which simplifies the process we’ll follow: (Open image for zoom)
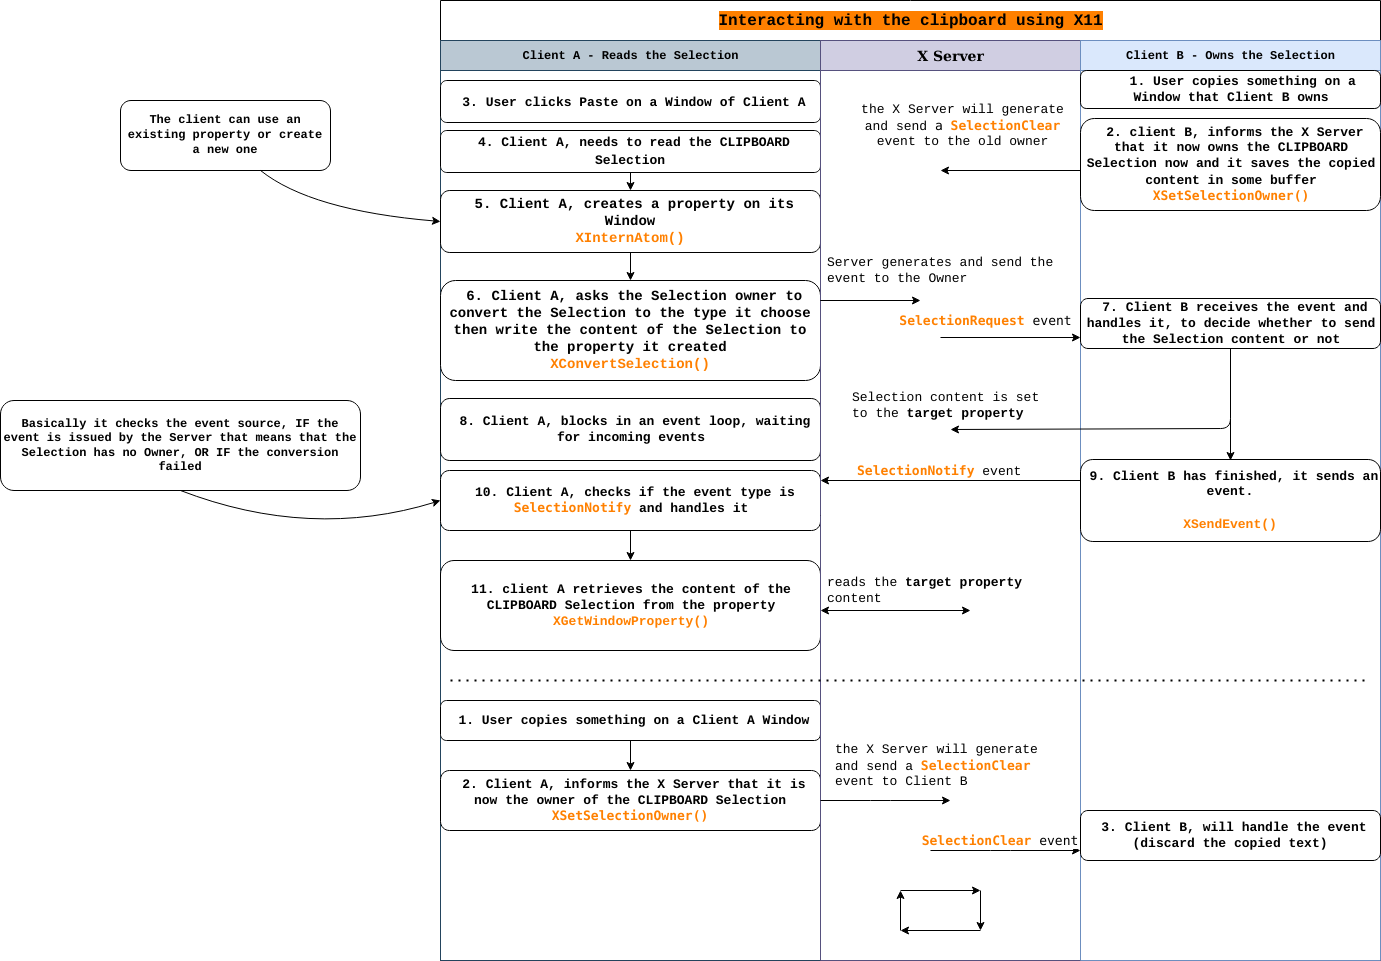 As you might have noticed from the diagram, the X Server does not save the Selections content instead he just route the events between the clients, and organizes the Inter Client Communication flow.
Reading the Selections content:
Reading Selections in X is done via Properties, to read a Selection you have to create a property in your Window and send that Property to the Owner with a target conversion, the Owner will convert the Selection content to what conversion you requested then save it to your property, once he is done he will send an Event to the Requestor(who requested the content).
To send the name of the Property we created, we have to tell the X Server to send a SelectionRequest Event to the Selection owner (the Event body contains all the info we need to send to the Owner like the target property, conversion type,..), and in order to do that we send a ConvertSelection request to the X Server, the X Server will use the Request content/fields to generate the SelectionRequest Event (what Selection, target property, what conversion type we want, who is asking for it ..), ofc we won’t do that ourselves, Xlib has a function to do it: XConvertSelection().
The owner will receive the Event and parse it (extract the our property, our Window, conversion type,..) and will try to convert the content of the selection to what we requested (e.g: STRING), and save the result to the property we sent to him, Once he is done he will send to us a SelectionNotify Event. then we can read the Property content (e.i: Selection content).
#include <X11/Xlib.h>
#include <stdio.h>
#include <string.h>

void read_from_property(Display*, Window, Atom, Atom);

int main(int argc, char* argv[]) {

	Display * xdpy;
	Window client_window, root_window, owner_window;
	int screen;
	Atom prop_name, prop_type, selection;
	XEvent event;
	XSelectionEvent selection_event;

	char * selection_name = argv[1];
	char * property_name = "WRITE_TO_HERE";
	char * property_type = "UTF8_STRING";

	if ( argc != 2 || strcmp(selection_name, "CLIPBOARD") && strcmp(selection_name, "PRIMARY") ) {
		printf("Usage: %s [PRIMARY/CLIPBOARD]\n", argv[0]);
		return 1;
	}

	xdpy = XOpenDisplay(NULL);
	if(!xdpy) {
		printf("Couldn't connect to the X Server\n");
		return 1;
	}

	screen = DefaultScreen(xdpy);
	root_window = RootWindow(xdpy, screen);
	client_window = XCreateSimpleWindow(xdpy, root_window, -10, -10, 1, 1, 0, 0, 0);

	selection = XInternAtom(xdpy, selection_name, False);
	prop_name = XInternAtom(xdpy, property_name, False);
	prop_type = XInternAtom(xdpy, property_type, False);
	if (!selection || !prop_name || !prop_type) {
		printf("Failed to create Atoms\n");
		return 1;
	}

	owner_window = XGetSelectionOwner(xdpy, selection);
	if (!owner_window) {
		printf("\"%s\" Selection has no owner", selection_name);
		return 1;
	}

	// LOG()
	printf("Root Window: 0x%lX\n", root_window);
	printf("Client Window: 0x%lX\n", client_window);
	printf("Atoms -> \"%s\": %ld -- \"%s\": %ld -- \"%s\": %ld \n", \
		selection_name, selection, property_name, prop_name, property_type, prop_type);
	printf("Selection \"%s\" is owned by 0x%lX \n", selection_name, owner_window);

	// request to convert the Selection content to UTF8 and write it to our property
	XConvertSelection(xdpy, selection, prop_type, prop_name, client_window, CurrentTime);

	// block waiting for the selection content
	while (1) {
		// read the next event from the Event Queue if nothing found wait until an event is recieved
		XNextEvent(xdpy, &event);
		// check the event type
		switch (event.type) {
			// content is written to the property
			case SelectionNotify:
				selection_event = (XSelectionEvent)event.xselection;

				if (!selection_event.send_event) {
					printf("Selection \"%s\" has no owner\n", selection_name);
					return 1;
				} else if (selection_event.property == None) {
					printf("Owner couldn't convert Selection \"%s\" content to the type \"%s\" \n", \
					selection_name, property_type);
					return 1;
				} else {
					read_from_property(xdpy, client_window, selection_event.property, prop_type); // we can use prop_name or selection_event.property they are the same
					return 0;
				}

			default:
				break;
		}
	}

	return 1;
}

void read_from_property(Display * xdpy, Window target_window, Atom prop_name, Atom prop_type) {
	/*
		int XGetWindowProperty(display, w, property, long_offset, long_length, delete, req_type,
				        actual_type_return, actual_format_return, nitems_return, bytes_after_return,
				        prop_return)
	*/
	// r_* vars will be written to by XGetWindowProperty()
	unsigned long size_to_retrieve, from_offset;
	Bool delete_after_read;
	unsigned long r_number_of_items;
	Atom r_type_of_prop;
	int r_format_of_prop;
	unsigned char * r_retrieved_data = NULL;
	unsigned long r_remaining_data_size;

	// double call XGetWindowProperty() to avoid reading the data partially
	// first call to get the size of data in r_remaining_data_size
	// second call to read the whole data

	// we first call XGetWindowProperty() to get the size of data in r_retrieved_data_size
	from_offset = 0; // retrieve from offest 0
	delete_after_read = False;
	size_to_retrieve = 0; // retrieve 0 bytes
	XGetWindowProperty(xdpy, target_window, prop_name, from_offset, size_to_retrieve, delete_after_read, prop_type, &r_type_of_prop, &r_format_of_prop, &r_number_of_items, &r_remaining_data_size, &r_retrieved_data);

	printf("Selection content size: %ld\n", r_remaining_data_size);
	XFree(r_retrieved_data); // free the allocation done by XGetWindowProperty()

	// read the whole data
	size_to_retrieve = r_remaining_data_size;
	XGetWindowProperty(xdpy, target_window, prop_name, from_offset, size_to_retrieve, delete_after_read, prop_type, &r_type_of_prop, &r_format_of_prop, &r_number_of_items, &r_remaining_data_size, &r_retrieved_data);
	printf("Selection content: %s", r_retrieved_data);
	XFree(r_retrieved_data); // free the allocation done by XGetWindowProperty()

}
Copy this and run the binary:
hakivvi@linux-box:~$ gcc read_selections.c -o read_selections -lX11
hakivvi@linux-box:~$ ./read_selections CLIPBOARD
Root Window: 0xA0
Client Window: 0x5000001
Atoms -> "CLIPBOARD": 475 -- "WRITE_TO_HERE": 643 -- "UTF8_STRING": 311
Selection "CLIPBOARD" is owned by 0x4600133
Selection content size: 29
Selection content: Copy this and run the binary:hakivvi@linux-box:~$
What the code does is:
- connect to the X Server
- create an unmapped window
- obtains the Atom of the first argument (e.g:
./program CLIPBOARD), as we said earlier if you want to manipulate any Selection you have to use its Atom. - create a property named WRITE_TO_HERE of type UTF8_STRING
- check if the Selection does even have an owner using
XGetSelectionOwner() - use
XConvertSelection()to tell the owner to convert the Selection content to UTF8_STRING and save it in WRITE_TO_HERE property attached to the client window.XConvertSelection()will send aSelectionRequestto the Selection owner (trough X Server) –see the diagram above–. - enter an event loop, and every time read one event from the Event Queue using
XNextEvent(), then:- if the event type is
SelectionNotify, then the event will contain aXSelectionEventstruct, assign it toselection_event- check the
send_eventfield of theselection_eventstruct, ifTruethat means the event is sent by the Owner after he has written to the property we gave him, ifFalsethen the sender is the X Server and that means the Selection has no owner - the
propertyfield of theselection_eventstruct should contain the property the Owner has written to orNoneon error. - if everything is OK, call
read_from_property()to read the property “WRITE_TO_HERE”.
- check the
- otherwise continue the loop
- if the event type is
read_from_property()function takes 4 args, X connection, target window, a property attached to the target window, type of the property, it then gets the VALUE of the specified property usingXGetWindowProperty()then prints it.- call
XGetWindowProperty()2 times, the first call we setsize_to_retrieveto 0, the function then will return size of the remaining data to retrieve inr_remaining_data_size, and as we read 0 bytes,r_remaining_data_sizewill equal the total size of the property value. - before the second call we assign the value of
r_remaining_data_sizetosize_to_retrieve, this timeXGetWindowProperty()will retrieve everything.
XEvent is just a typedef of a union, XEvent contains the type field (type of Event) and a possible sub-event struct and padding, using the type field we can know what the other sub structure is, in our case we are expecting a SelectionNotify Event, if the type matches that then the other sub-event structure is XSelectionEvent we type-cast to that so we can access that structure, the later is where we will find the data we need (property, sender, ..), here is the XEvent definition:
typedef union _XEvent {
	int type;	/* must not be changed */
	XAnyEvent xany;
	XKeyEvent xkey;
	XButtonEvent xbutton;
	XMotionEvent xmotion;
	XCrossingEvent xcrossing;
	XFocusChangeEvent xfocus;
	XExposeEvent xexpose;
	XGraphicsExposeEvent xgraphicsexpose;
	XNoExposeEvent xnoexpose;
	XVisibilityEvent xvisibility;
	XCreateWindowEvent xcreatewindow;
	XDestroyWindowEvent xdestroywindow;
	XUnmapEvent xunmap;
	XMapEvent xmap;
	XMapRequestEvent xmaprequest;
	XReparentEvent xreparent;
	XConfigureEvent xconfigure;
	XGravityEvent xgravity;
	XResizeRequestEvent xresizerequest;
	XConfigureRequestEvent xconfigurerequest;
	XCirculateEvent xcirculate;
	XCirculateRequestEvent xcirculaterequest;
	XPropertyEvent xproperty;
	XSelectionClearEvent xselectionclear;
	XSelectionRequestEvent xselectionrequest;
	XSelectionEvent xselection;
	XColormapEvent xcolormap;
	XClientMessageEvent xclient;
	XMappingEvent xmapping;
	XErrorEvent xerror;
	XKeymapEvent xkeymap;
	long pad[24];
} XEvent;
all the X* are the possible Events the XEvent union may contain, in our case (type == SelectionNotify) XEvent will look like this:
typedef union _XEvent {
	XSelectionEvent xselection; // the Event
} XEvent;
and XSelectionEvent struct is defined like this:
typedef struct {
    int type;    /* SelectionNotify */
    unsigned long serial;    /* # of last request processed by server */
    Bool send_event;    /* true if this came from a SendEvent request */
    Display *display;    /* Display the event was read from */
    Window requestor;
    Atom selection;
    Atom target;
    Atom property;    /* atom or None */
    Time time;
} XSelectionEvent;
so when i used XEvent.type == SelectNotify it is actually XEvent.sub_event.type == SelectNotify, it works because the first member of XEvent and all the other Events structures is type and because XEvent is a union.
Also Xlib defines a special X Event type: XAnyEvent, this struct is the head of any Event:
typedef struct {
	int type;
	unsigned long serial;	/* # of last request processed by server */
	Bool send_event;	/* true if this came from a SendEvent request */
	Display *display;	/* Display the event was read from */
	Window window;
} XAnyEvent;
As you can see all of these members are defined in XSelectionEvent (and all the other Events as well) only the names are different:
typedef struct {
    int type;    /* SelectionNotify */
    unsigned long serial;    /* # of last request processed by server */
    Bool send_event;    /* true if this came from a SendEvent request */
    Display *display;    /* Display the event was read from */
    Window requestor;
    // the rest of members
} XSelectionEvent;
NOTE: the name of the property which the owner writes to, can be anything, we can call it after the Selection (e.i: PRIMARY/CLIPBOARD) or anything else we want.
To be Continued:
This blogpost was actually just a couple of notes i wrote, i decided later to turn it into a post maybe it helps someone, and it is already long, also my free time is up, i didn’t have a chance to cover how to own a Selection, TARGETS, Drag and drop.. i will try to write a part 2, i hope this one was helpful to you.
Thanks for reading and goodbye!
Further Reading: